3D Printing
This entry is about 3D printing:
To begin with, our lecturer first gave us some basic background information on the 3D printers available in DCHE labs such as the material available, the printing volume and the printing speed. Next, we learned how to convert 3D design into 3D representable file. Also, we learned how to slice the 3D representable files into layers for 3D printing. With these we have the basic foundation needed to 3D print a design.
Having the knowledge gain from 3D printing tutorial, we were then given our task for 3D printing practical. For this practical, we were tasked to design and 3D print an object that could not be easily made subjectively. To give us an idea on what is an object that could not be easily made subjectively, our lecturer show us several examples such as a whistle, a ball in a box, etc. I was impressed by the whistle he made as it is not an easy task to make a moveable ball inside a whistle. Hence, after seeing this, I aim to make a whistle and make it work.
This is the tutorial video that I found on to guide: Tutorial video
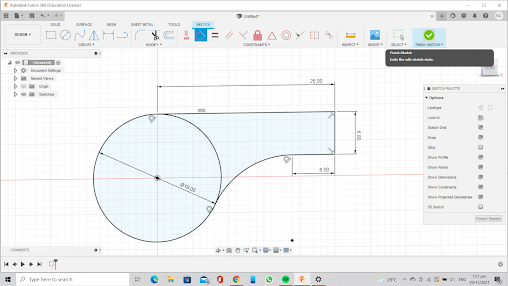
Step 1: Construct the main body of the whistle
- Firstly, construct a circle with diameter 18mm

- Next, Draw the outline of the whistle using lines


- Join the outline of the whistle and the circle using an arc to form the shape of a whistle.

Using the Arc function, select 3 point Arc to form the outline of the whistle.

After the arc is form, select tangent on the circle and the arc to lock them together.

When the arc is being locked, the line will turn black in colour.
Step 2: Forming the outer part of the whistle
- Click Finish sketch and select the parts to extrude.

When extruding the figure, select symmetric.
- Turn this figure in a hollow one.

To make this figure hollow, select the opening on the figure and select the shell function under modify.

With the inside thickness being set at 1mm, this is how it looks like.
Step 3: Section analyse the figure
Inspect>Section analysis>Select the plane to analyse


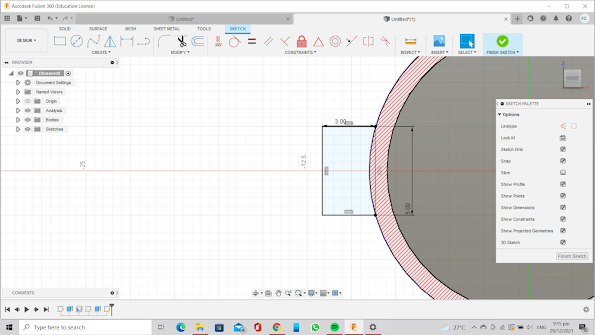
Step 4: Form holes on the Whistle.
- First select preferences, under design, turn auto project on references on


- Draw two lines with 45 and 135 degree respectively on the upper thickness of the whistle form holes.

Select two points on the lines to define a distance of 3mm between the lines.

To lock the two lines, define one more dimension from the edge to the lines of 2mm


Step 5: To make a holder for the whistle.
- Draw a rectangle 5mm by 3mm

- Use the function coincident to join the rectangle to the whistle

- Select tangent arc to form a semicircle on the rectangle


- Draw a circle with diameter 3mm to form the shape to a holder

- Select finish sketch to extrude the whistle holder to 3mm thick

Step 6: Remove any sharp edges on the whistle
- Select fillet and select the edges with a radius of 0.25mm


Step 7: Make a movable ball inside the whistle
- Create sketch, draw a line with length 8mm and draw a circle at the middle of the line


- Drag the circle into the whistle and lock with the tangent function


- To make the circle into a sphere, select Revolve, select half of the surface with 360 degree


With this, the whistle is completed.

Cura setting used:
- First, right click on the file and select save as Mesh

- For format, select STL binary

- After these, Ultimake Cura is launched

- First select the printer that you are using

- For the printing quality, the only setting I had changed from the default one is the layer height to reduce the printing time.

Why whistle cannot be made subjectively?
A whistle cannot be made subjectively because once the shape of the whistle is being made, the ball ca no longer fit into the opening of the whistle. Therefore, s whistle cannot be made subjectively.
Hero shot of myself and printed object:


Reflection
The main objective of this practical is to design and make an object that could not be easily made subjectively. This practical examine our creativity, skills to design using Fusion 360 and the ability to operate a 3D printer. I have decided to make a whistle as i find that to make a moveable ball inside a whistle is a challenging and interesting task. To challenge myself, I decided to make a whistle for this task. To help myself, I manage to find a tutorial video to guide me along the making process using fusion 360. From the tutorial video, I have learned to use different functions in Fusion 360 such as using the Shell function to make the opening of the whistle and Revolve to make a circle into a sphere. After this whistle is done, I proceed with slicing the 3D design. During the slicing process, I could have use a fine layer height of 0.1mm instead of 0.2mm but to reduced the printing, I increased the layer height to 0.2mm. This is so to spare so time just in case I made any mistake.
During printing of the product, there are some seniors there to guide us on how to operate the 3D printers. I failed my first few attempt of printing as I did not realised that I have selected the wrong printed on Cura which wasted about 15mins of my printing time. After this problem is solved, the printing process went smoothly.
When the whistle is 3D printed, I tired to blow it but there is no sound coming out. Through consulting with my lecturer and reflecting on the making process of the whistle, I realised that I followed the tutorial video too closely and have opening that is too big. This is because having a large opening and exit point resulted in a low pressure drop which means the energy gain by the ball is not enough to produce sound. To solve this problem, I can make the opening and exit point smaller to have a larger pressure using Bernoulli's equation which can then exerts more energy onto the ball and hence, to make the whistle work by producing sound.
Through this practical, I learned to take initiative to find resources online and also not to rely to much on the available tutorial video as it might not be suitable for my product.
This practical is important as it gives us a hands on experience on 3D printing that gives a better understanding on how 3D printer works. To me, the most interesting part of this practical is the moment where I can see the product that I design is being formed layer by layer and the moment where the product is completed. These moments gave me a sense of accomplishment. This practical is useful for projects in CP5070 and it taught us the basic skills and knowledge needed for 3D printing which can be used for our prototype and Capstone.
I used to think that designing a product for 3D printing and operate a 3D printing is difficult. Now I think that it is not as difficult as what i thought. After completing this practical, I feel that my skill is designing a product using Fusion 360 is better and through hands on experience, I am confident in operating a 3D printer. With the skill I have acquired from this practical, I use it in my prototype in CP5070 and Capstone project.

Comments
Post a Comment